Developer Guide
Content Page
-
2.1 Prerequisites
-
3.1 Architecture
3.2 UI Component
3.3 Parser Component
3.4.1 CLI
Commands related to Spending List3.4.2 CLI
Commands related to Repayment List3.4.3 CLI
Commands related to Budget3.4.4 General CLI
Commands3.4.5 Hidden
Commands3.5 Data Component
3.5.1 Spending List
3.5.2 Repayment List
3.5.3 Budget
-
4.1 Add Feature
4.2 Clear Feature
4.3 Edit Feature
4.4 Convert Feature
4.6 Warn Feature
4.7 Repay Feature
4.8 Summary Feature
4.9 Reminder Feature
4.11 Export Feature
4.12 Draw Feature
-
5.1 Build Automation
5.3 Making a Release
Appendix A: About the Product
Appendix B: User Stories
Appendix C: Non-Functional Requirements
Appendix D: Glossary
Appendix E: Instructions for Manual Testing
1. Introduction
Cent Wise Dollar Wise is a desktop application for money management, optimised for use via a Command Line Interface (CLI). This application aims to help NUS hostel students manage their financial situation and track their spending efficiently. This developer guide provides information on the architecture and design of the application. It will not only help you get started as a Cent Wise Dollar Wise contributor, but that you will find useful to refer to even if you are already a contributor of this project.
2. Setting Up
2.1 Prerequisites
- JDK 11
- IntelliJ IDE
Note: IntelliJ by default has Gradle and JavaFx plugins installed.
Note: Do not disable them. If you have disabled them, go to File > Settings > Plugins to re-enable them.
2.2 Setting Up the Project in your Computer
The following are the steps to set up the project on your computer:
- Fork this repo, and clone the fork to your computer.
- Open IntelliJ. If you are not on the welcome screen, click File > Close Project to close the existing project dialog first.
- Set up the correct JDK version for Gradle.
- Click Configure > Project Defaults > Project Structure.
- Click New… and find the directory of the JDK.
- Click Import Project.
- Locate the build.gradle file and select it. Click OK
- Click Open as Project
- Click OK to accept the default settings
- Open a console and run the command
gradlew processResources(Mac/Linux:./gradlew processResources). It should finish with the BUILD SUCCESSFUL message. This will generate all resources required by the application and tests.
2.3 Verifying the Setup
The following are the steps to verify your setup:
- Run the seedu.duke.Duke and try a few commands.
- Run the tests and ensure all the tests pass.
3. Design
3.1 Architecture
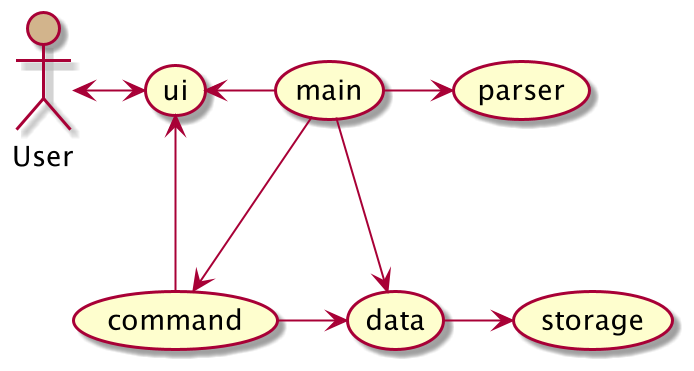
The architecture diagram above explains the high-level design of the application. Below is a quick overview of each component:
Main: Initializes spending list at app launch and coordinates the interaction between other components
Data: Stores the data collected from the user
Storage: Reads data from and writes data to the hard disk
Ui: Interacts with the user
Command: Executes the user command or system-issued command
Parser: Analyzes the user command
Utilities: Contains classes that are used by multiple components
How the Architecture Components Interact with Each Other
The sequence diagram below shows how the components interact with each other when the user issues a general command.

3.2 UI Component
This component, consisting of the Ui class, is responsible for receiving user input and displaying appropriate output messages for the user. This includes error messages, warning messages, encouragement quotes, and messages that indicate if a command is successfully executed.
3.3 Parser Component
Parser component is responsible for interpreting given input as a command. It verifies that the format complies with User Guide specification. Then, it matches the appropriate command or error, and formats the provided arguments into parameters for internal methods.
Each command can take either no argument or some arguments. Commands taking no arguments will call checkRemainingCommands() to verify correct input format. Commands with arguments will extend Parser superclass and implement 2 methods:
Parser()to initialiseParsersubclass with the expected arguments for the detected commandparse(String[] args)verifies argument format and returns the appropriateExceptionorCommandsubclass instance with their formatted arguments.
3.4 Command Component
Every command that a user can input into the application is represented by an object that extends the abstract class Command. In addition, hidden commands that do not require user inputs also extends from the same abstract class Command. Command contains some basic methods that are shared by all types of commands, including:
execute(), which is called after setting up the object appropriately, to perform the action requested by the user; andisExit(), which returns a boolean that indicates whether the program should terminate after the command is executed.
The following sections classify the Commands into different types based on their functionality within the application.
3.4.1 CLI Commands related to Spending List
The following class diagram describes the CLI Commands specifically related to the spending list.

3.4.2 CLI Commands related to Repayment List
The following class diagram describes the CLI Commands specifically related to the repayment list.

3.4.3 CLI Commands related to Budget
The following class diagram describes the CLI Commands specifically related to the budget.

3.4.4 General CLI Commands
The following class diagram describes general CLI Commands that apply to the whole application.

3.4.5 Hidden Commands
The following class diagram describes the hidden commands within the program.

3.5 Data Component
This component holds the data of the application, including the SpendingList, RepaymentList and Budget class in the memory.
3.5.1 Spending List
The SpendingList class stores a list of Item objects that the user has spent. The SpendingList does not depend on Ui, Parser and Storage components.
below shows a class diagram of how SpendingList interacts with other classes.

3.5.2 Repayment List
The RepaymentList class stores a list of Repay objects. Similar to SpendingList class, RepaymentList class does not depend on other components.
below shows a class diagram of how RepaymentList interacts with other classes.

3.5.3 Budget
The Budget class stores the budget in the specified currency and the date it was updated. Similar to SpendingList class, Budget class does not depend on other components.
below shows a class diagram of how Budget interacts with other classes.

3.6 Storage Component
Storage component persists user data across sessions by storing data in a .json file. To avoid coupling between unrelated components (e.g. Ui and Item), objects are persisted by reflection of their variables and methods. Thus, only SpendingList, RepaymentList and Budget maintain instances of Storage to trigger writes to file upon changes in their memory.
Since this component relies on the external package com.google.code.gson:gson:2.8.6 for reflection, we encapsulate gson methods in the following class diagram:

4. Implementation
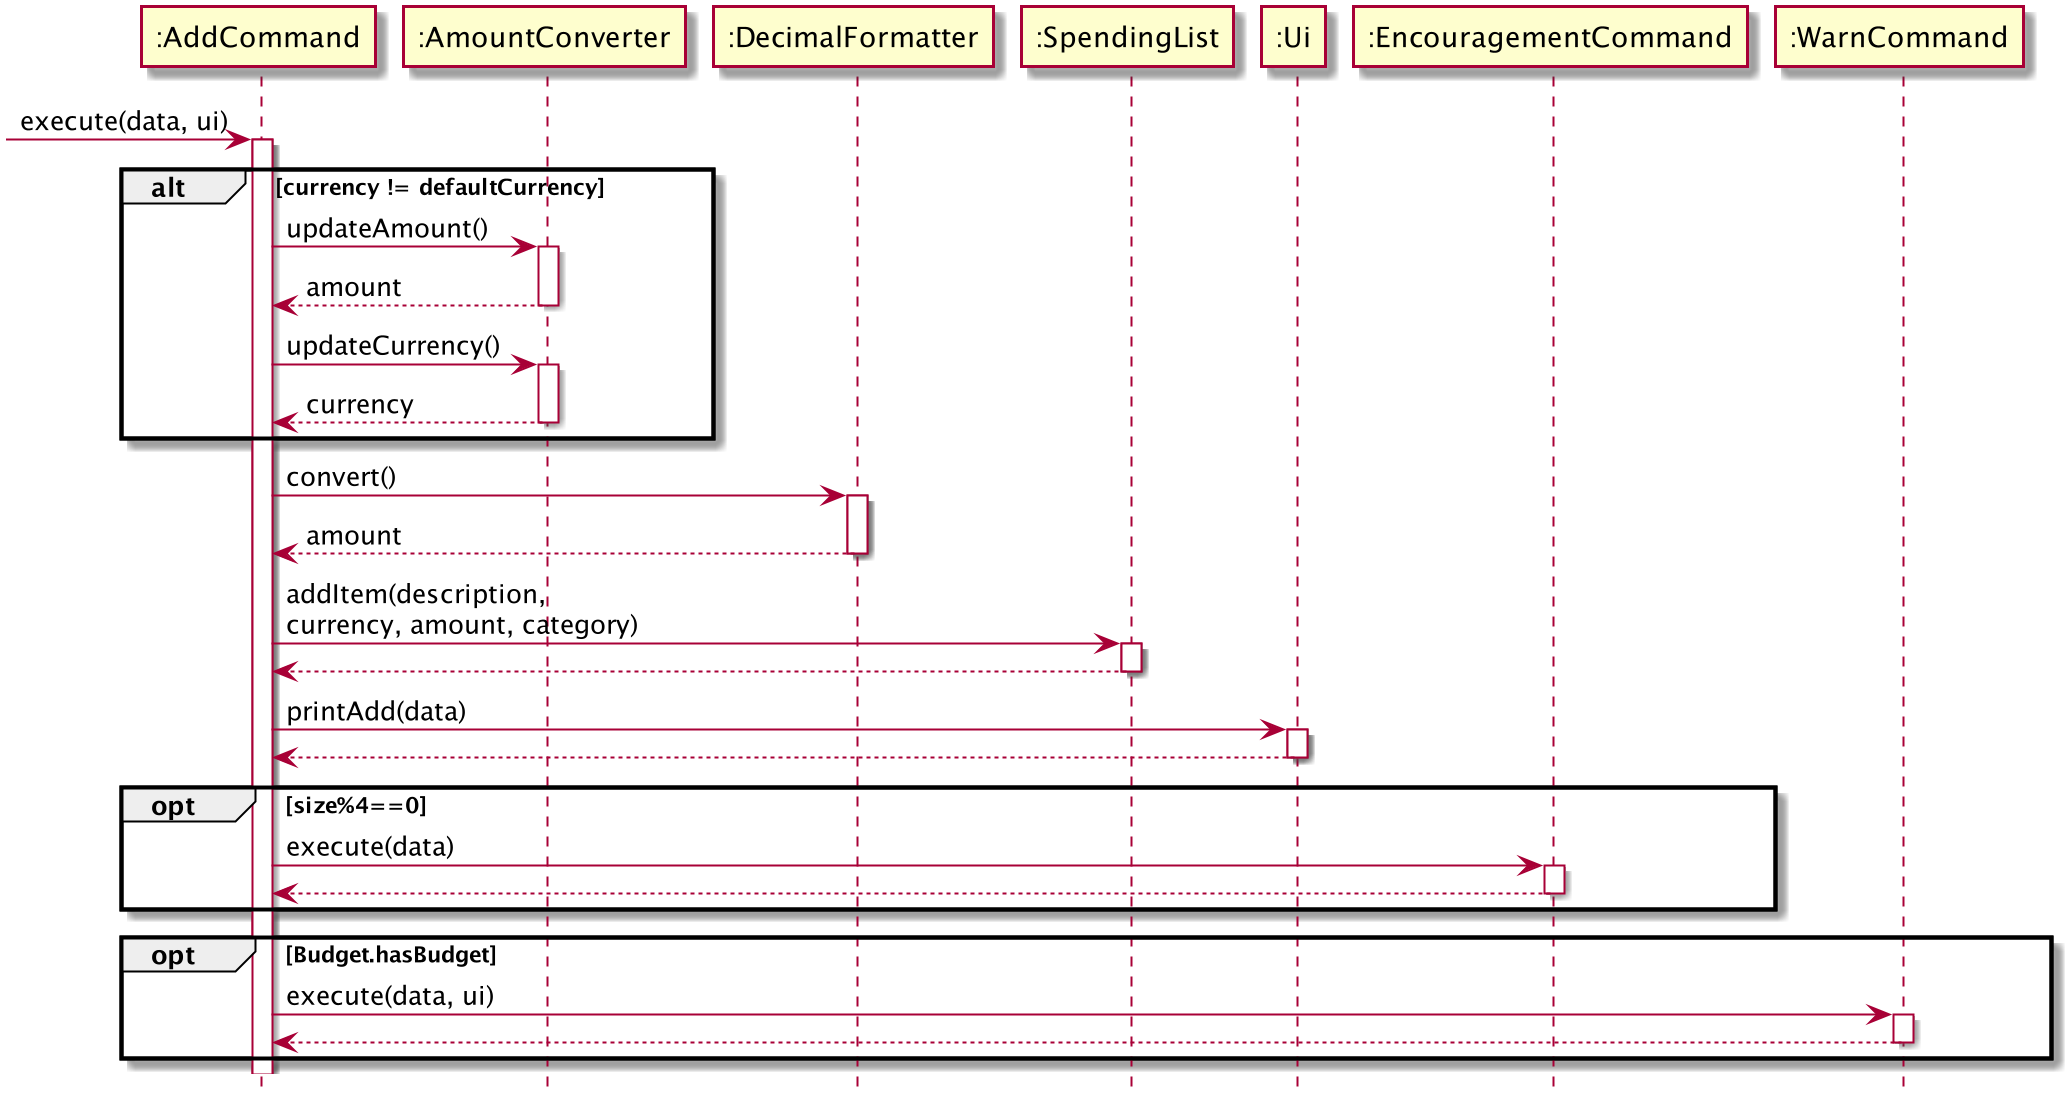
4.1 Add Feature
SpendingList, SpendingListCategoriser and Ui facilitate this feature. The Add feature is able to add a new item into the spending list. It implements the following operations:
AmountConverter#updateAmount→ converts amount to SGDAmountConverter#updateCurrency→ updates currency to SGDSpendingList#addItem→ adds item into the spending listUi#printAdd→ prints the message that the item is successfully added into the spending listSpendingListCategoriser#execute→ categorises the item in the spending listWarnCommand#execute→ prints a warning message if total spending amount approaches the threshold of 90% of the budget limit or when the total spending amount exceeds the budget limit
Below shows an example of usage:
- User types
add -c food -d beer -s USD 10to add beer into the spending list - The
addcommand callsAddCommand#execute AddCommand#executecalls the following operations in order:AmountConverter#updateAmountto convert the amount “10” to SGDAmountConverter#updateCurrencyto update the currency from “USD” to “SGD”SpendingList#addItemto add beer into the spending listUi#printAddto print a message if beer is successfully added into the spending listSpendingListCategoriser#executeto categorise beer under the food category of the spending listWarnCommand#executeto print a warning message if required
The following sequence diagram illustrates how this feature works.
4.2 Clear Feature
SpendingList, RepaymentList and Budget facilitate this feature. The Clear feature is able to clear existing data (either budget, repayment entries, spending entries, or all), according to the user’s command. It implements the following operations:
ClearBudgetCommand#execute→ clears budget and prints message outputClearSpendingListCommand#execute→ clears spending list and prints message outputClearRepaymentListCommand#execute→ clears repayment list and prints message outputPurgeDataCommand#execute→ clears all data from budget, spending list and repayment list, and prints message outputBudget#clearBudget→ clears budgetRepaymentList#deleteRepaymentEntry→ deletes a particular entry of the repayment listRepaymentList#clearAllEntries→ clears all entries of the repayment listUi#printClearAllRepaymentList→ prints the message that all entries in the repayment list are clearedSpendingList#deleteItem→ deletes a particular entry of the spending listSpendingList#clearAllItems→ clears all entries of the spending listUi#printClearAllSpendingList→ prints the message that all entries in the spending list are clearedUi#printClearIndex→ prints the message that an entry is cleared from either the repayment list or the spending listUi#printPurgeData→ prints the message that all data is cleared
Below shows an example of usage:
- User types
clear -s 1to clear the first entry in the spending list. - ClearSpendingListCommand calls
ClearSpendingListCommand#execute, which calls the following operations in order:SpendingList#clearAllItemsto clear all items in the spending list and saves the updated spending list in storage.Ui#printClearAllSpendingListto print a message if the spending list is cleared successfully
The following sequence diagram illustrates how clearing a spending list works.
![]()
4.3 Edit Feature
SpendingList, AmountConverter, DecimalFormatter and Ui facilitate this feature. The Edit feature is able to edit the existing items in the spending list.
It implements the following operations:
EditCommand#execute→ edit the spending list accordingly and calls the Ui to print message outputSpendingList#editItemDescription→ updates the description of the item in the spending listSpendingList#editItemCategory→ updates the category of the item in the spending listSpendingList#editItemAmount→ updates the amount of the item in the spending listAmountConverter#updateAmount→ converts the amount based on the default currencyAmountConverter#updateCurrency→ converts the currency to the default currencyDecimalFormatter#convert→ converts the amount to 4 d.p.Ui#printEdit→ prints the message to show the successful completion of the edition process
Below shows an example of the usage:
- User executes
edit 1 bubble teacommand to edit the first item in the spending list to bubble tea - The
editcommand calls theEditCommand#executeto complete the edition process
The following sequence diagram illustrates how this feature works.

4.4 Convert Feature
SpendingList and Ui facilitate this feature. The Convert feature is able to convert the currency of the items
stored in the spending list. It implements the following operations:
ConvertCommand#execute→ converts currency and calls the ui to print message outputSpendingList#getSpendingList→ retrieves the current spending listConvertCommand#identifyCurrency→ identifies the currency after conversionConvertCommand#findExchangeRate→ finds the corresponding exchange rateConvertCommand#updateList→ updates the new amount and the new currency after conversionSpendingList#updateSpendingList→ updates the spending list after conversionConvertCommand#updateBudgetList→ updates the budget limit after conversionUi#printConvertCurrency→ prints the message to show the successful completion of the conversion process
Below shows an example of the usage:
- User executes
convert SGD USDcommand to convert the currency from SGD to USD - The
convertcommand calls theConvertCommand#executeto complete the conversion process
The following sequence diagram illustrates how this feature works.

4.5 Set Budget Feature
Budget, AmountConverter , DecimalFormatter and Ui facilitate this feature. The Set Budget feature is able to set the budget limit for the spending.
It implements the following operations:
AmountConverter#updateAmount→ converts the budget limit based on the default currencyAmountConverter#updateCurrency→ converts the currency to the default currencyDecimalFormatter#convert→ converts the budget limit to 4 d.p.Budget#addBudget→ stores the budget limit with its corresponding currencyUi#printBudgetLimit→ prints the message to show the successful completion of the setting budget process
Below shows an example of usage:
- User executes
set SGD 100.0to set the budget limit to SGD 100.0 - The
setcommand callsSetBudgetCommand#executeto complete the set budget process
The following sequence diagram illustrates how this feature works.

4.6 Warn Feature
Budget, SpendingList and Ui facilitate this feature. The Warn feature is able to warn the user when the total
spending amount approaches the threshold of 90% of the budget limit or when the total spending amount exceeds
the budget limit. It implements the following operations:
Budget#getCurrency→ retrieves the corresponding currency for the budgetBudget#getBudgetLimit→ retrieves the budget limitSpendingList#getCurrentAmount→ gets the total amount of spending in the spending listUi#printApproachingWarningMessage→ prints the warning message that the spending is approaching the budget limit (i.e. exceeds the threshold value of 90% of the budget limit but not yet exceed it), with the amount remainingUi#printExceedingWarningMessage→ prints the warning message that the spending has exceeded the budget limit
Below shows an example of usage:
- User adds the spending to the spending list after setting the budget limit
- The
addcommand callsWarnCommand#executeto check if the user approaches or exceeds the budget limit
The following sequence diagram illustrates how this feature works.

4.7 Repay Feature
RepaymentList, DecimalFomatter and Ui facilitate this feature. The Repay feature is able to store the repayment information as a
reminder to the user. It implements the following operations:
DecimalFormatter#convert→ converts the repayment amount to 4 d.p.RepaymentList#AddItem→ adds the repayment information to the repayment listUi#printRepay→ prints the repayment information which has been successfully stored
Below shows an example of usage:
- User executes
repay Johnny SGD 5.0 2020-12-20command to add the repayment information that one has to repay SGD 5.0 to Johnny before 2020-12-20 - The
repaycommand calls theRepayCommand#executeto complete the adding process
The following sequence diagram illustrates how this feature works.

4.8 Summary Feature
SpendingList and Item facilitate this feature. The Summary feature is able to summarise the total amount spent
given a date. It implements the following operations:
Item#getDate→ gets the date when user spent on the itemItem#getAmount→ gets the amount spent on the itemSpendingList#getSpendingAmountTime→ gets the total amount spent during a periodSpendingList#getSpendingAmountCategory→ gets the total amount spent of a given category
Below shows an example of usage:
- User executes the
summary 2020command to get the amount spent during year 2020. - The
summarycommand will first update the current currency symbol. - The
summarycommand callsSpendingList#getSpendingAmountTimewhich checks the spending date of every item stored in the memory. - If the item is spent during year 2020, the amount spent will be summed up.
- The
summarycommand will also callSpendingList#getSpendingAmountCategoryto sum up the expenses in each category during the year 2020.
The following sequence diagram illustrates how this feature works.

4.9 Reminder Feature
SpendingList and WarnCommand facilitate this feature. The Reminder feature is able to provide the user about the
total expenditure of the current week, starting on Monday. It implements the following operations:
SpendingList#getSpendingAmountTime→ gets the total amount spent during a periodWarnCommand#execute→ gives out warnings if overspending
Below shows an example of usage:
- User starts the application.
- The
ReminderCommandwill be instantiated. The dates of the current week (starting from Monday) will be saved to a list. - The
remindercommand will first update the current currency symbol. - In the
ReminderCommand#execute(Data, Ui), a check will be done to see if there is any budget being set by the user.- If no budget is being set, the total expenditure of current week will be tallied up.
- If there is,
WarnCommand#execute(Data, Ui)will be called first before tallying up the expenditure.
The following sequence diagram illustrates how this feature works.

4.10 Encouragement Feature
Ui facilitates this feature. The Encouragement feature regularly encourages the user to keep up his effort in using the application. It implements the following operation:
Ui#printEncouragementMessage() → prints an encouragement message for the user
This is a hidden feature that will be executed automatically by the application for every four spending entries that the user inputs.
The following sequence diagram illustrates how this feature works.

4.11 Export Feature
Workbook, FileOutputStream, SpendingList and Ui facilitate this feature. The export data feature could extract the current data and export to an Excel file. It implements the following operations:
Workbook#createSheet→ creates a sheet in the workbookSpendingList#getItem→ gets the item waiting to be added to the workbookWorkbook#write→ writes the data to an Excel fileUi#printExportMessage→ prints the message indicating that the Excel file has been created successfully
Below shows an example of usage:
- User executes the
export F:\command to export the data to the locationF:\. - The
exportCommandcalls theWorkbook#createSheet()to create an Excel workbook sheet. SpendingList#getItemwill be called repeatedly to get items and set the cells’ values accordingly.- After writing to an Excel file at the location
F:\usingWorkbook#write, a prompt message will be shown byUi.
The following sequence diagram illustrates how this feature works.

4.12 Draw Feature
Workbook, FileOutputStream, SpendingList and Ui facilitate this feature. The draw feature analyzes the target records and plot two charts accordingly. It implements the following operations:
Workbook#createSheet→ creates a sheet in the workbookSpendingList#getItem→ gets the item waiting to be added to the workbookDrawCommand#getYearMapDrawCommand#getMonthMapDrawCommand#getDayMap→ returns a map containing the information of sum of amount in recordsDrawCommand#getCategories→ returns a map containing the information of proportions of different categoriesDrawCommand#drawChart→ generate charts in the worksheetWorkbook#write→ writes the data to an Excel fileUi#printDrawMessage→ prints the message indicating that the charts have been generated successfully
Below shows an example of usage:
- User executes the
draw 2020command to generate charts for the year 2020. - The
drawCommandcalls theWorkbook#createSheet()twice to create two Excel workbook sheet. SpendingList#getItemwill be called repeatedly to get items.DrawCommand#getMonthMapandDrawCommand#getCategorieswill be called to analyze the data and decide which data are going to be shown in the charts.- After processing of data,
DrawCommand#drawChartwill be called to generate charts in worksheets. - After writing to an Excel file using
Workbook#write, a prompt message will be shown byUi.
The following sequence diagram illustrates how this feature works.

5. Dev Ops
5.1 Build Automation
This project uses Gradle for build automation and dependency management.
Given below are how to use Gradle for some important project tasks:
clean: Deletes the files created during the previous build tasks (e.g. files in the build folder). e.g. ./gradlew cleanshadowJar: Uses the ShadowJar plugin to creat a fat JAR file in the build/lib folder, if the current file is outdated. e.g. ./gradlew shadowJarrun: Builds and run the program.runShadow: Builds the application as a fat JAR, and then runs it.checkstyleMain: Runs the code style check for the main code base.checkstyleTest: Runs the code style check for the test code base.test: Runs all tests../gradlew test— Runs all tests./gradlew clean test— Cleans the project and runs tests
5.2 Continuous Integration (CI)
This project uses GitHub Actions for CI. The project comes with the necessary GitHub Actions configurations files (in the .github/workflows folder).
5.3 Making a release
Here are the steps to create a new release:
- Generate a fat JAR file using Gradle by using the command
gradlew shadow(Mac/Linux:./gradlew clean shadowJar). - Find the JAR file in the
build/libsdirectory. - Tag the repository with a new version number.
- Create a new release using GitHub. Upload the JAR file you created.
5.4 Coverage Reporting
We use the IntelliJ IDEA’s coverage analysis tool for coverage reporting. A video tutorial on how to use this tool can be found here.
Appendix A: About the Product
Target User Profile
The target user is NUS hostel students including both local students and international students.
Value Proposition
We observed that hostel students are encountering tight budgets due to expensive hostel fees, on top of their school
tuition fees. Hence, we are developing a money manager targeted at NUS hostel students. This money manager
Cent Wise Dollar Wise aims to help hostel students to have better financial management with a limited budget.
Appendix B: User Stories
This table describes the user stories considered while implementing the features in Section 4:
| Version | As a (/an) … | I want to … | So that I can … |
|---|---|---|---|
| v1.0 | international student | convert local currency to foreign currency or the reverse way | trace my spending easily |
| v1.0 | careless user | view and edit the previous input | ensure the data input is correct |
| v1.0 | user | have a monthly/yearly summary | know how much I had spent |
| v1.0 | user | clear specific data | ensure all data stored are up-to-date and correct |
| v2.0 | user | set a budget limit | be less likely to overspend my money |
| v2.0 | user | be warned when my spending approaches the budget limit or exceeds the budget limit | be less likely to overspend my money |
| v2.0 | big spender | tag purchases according to categories | for an easier overview |
| v2.0 | user | have weekly reminders on how much has spent | take note of future spending |
| v2.0 | forgetful user | include a list to summarise the repayment to others | repay the debt on time |
| v2.0 | user | be encouraged while managing the finance | keep managing the fiance persistently |
| v2.0 | user | export all saving data to other devices | keep managing the fiance after changing the device |
Appendix C: Non-Functional Requirements
The following statements describe the non-functional requirements for the application:
- The system should respond within two seconds.
- The system should be easy to use, do not require much effort to learn.
- The system should work on any mainstream OS that has Java 11 or above installed.
- Users with faster typing speed than average should be able to use this program with ease.
Appendix D: Glossary
- Mainstream OS: Windows, Linux, macOS
Appendix E: Instructions for Manual Testing
Given below are the instructions to test the application manually.
E.1 Launch
- Download the jar file and copy into an empty folder.
- Navigate to the folder in the command prompt.
- Enter
java -jar Duke.jarand pressenterto launch the application. - You should expect a new
datafolder created within the same folder as the jar file.
E.2 Application Commands
1. Draw Command
Download duke_spending.json here and copy the file into the ‘data’ folder. Test the command by executing draw 2020. You should expect to see the following output in Microsoft Excel.

2. Other Commands
Please refer to Cent Wise Dollar Wise User Guide.